All posts by notjustanotherfoodblogger

What I Wish I Had Known Before My Home Renovation

I’ve been pretty quiet… ok, downright silent on the blogging front lately because I bought an 80 yr old house and have been completely overtaken by the renovation and the roller coaster of excitement and despair that comes with it.  Once I finish the renovation and have some “after” photos, I’ll post some before and afters.  But until then I’m finally in my house, and it’s moving each day a little bit closer to “done.”  Well, I don’t know about REALLY done, but I’ll settle for covers on all my outlets, doors and knobs on all my cabinets, and shutters to replace the sheets covering my windows.

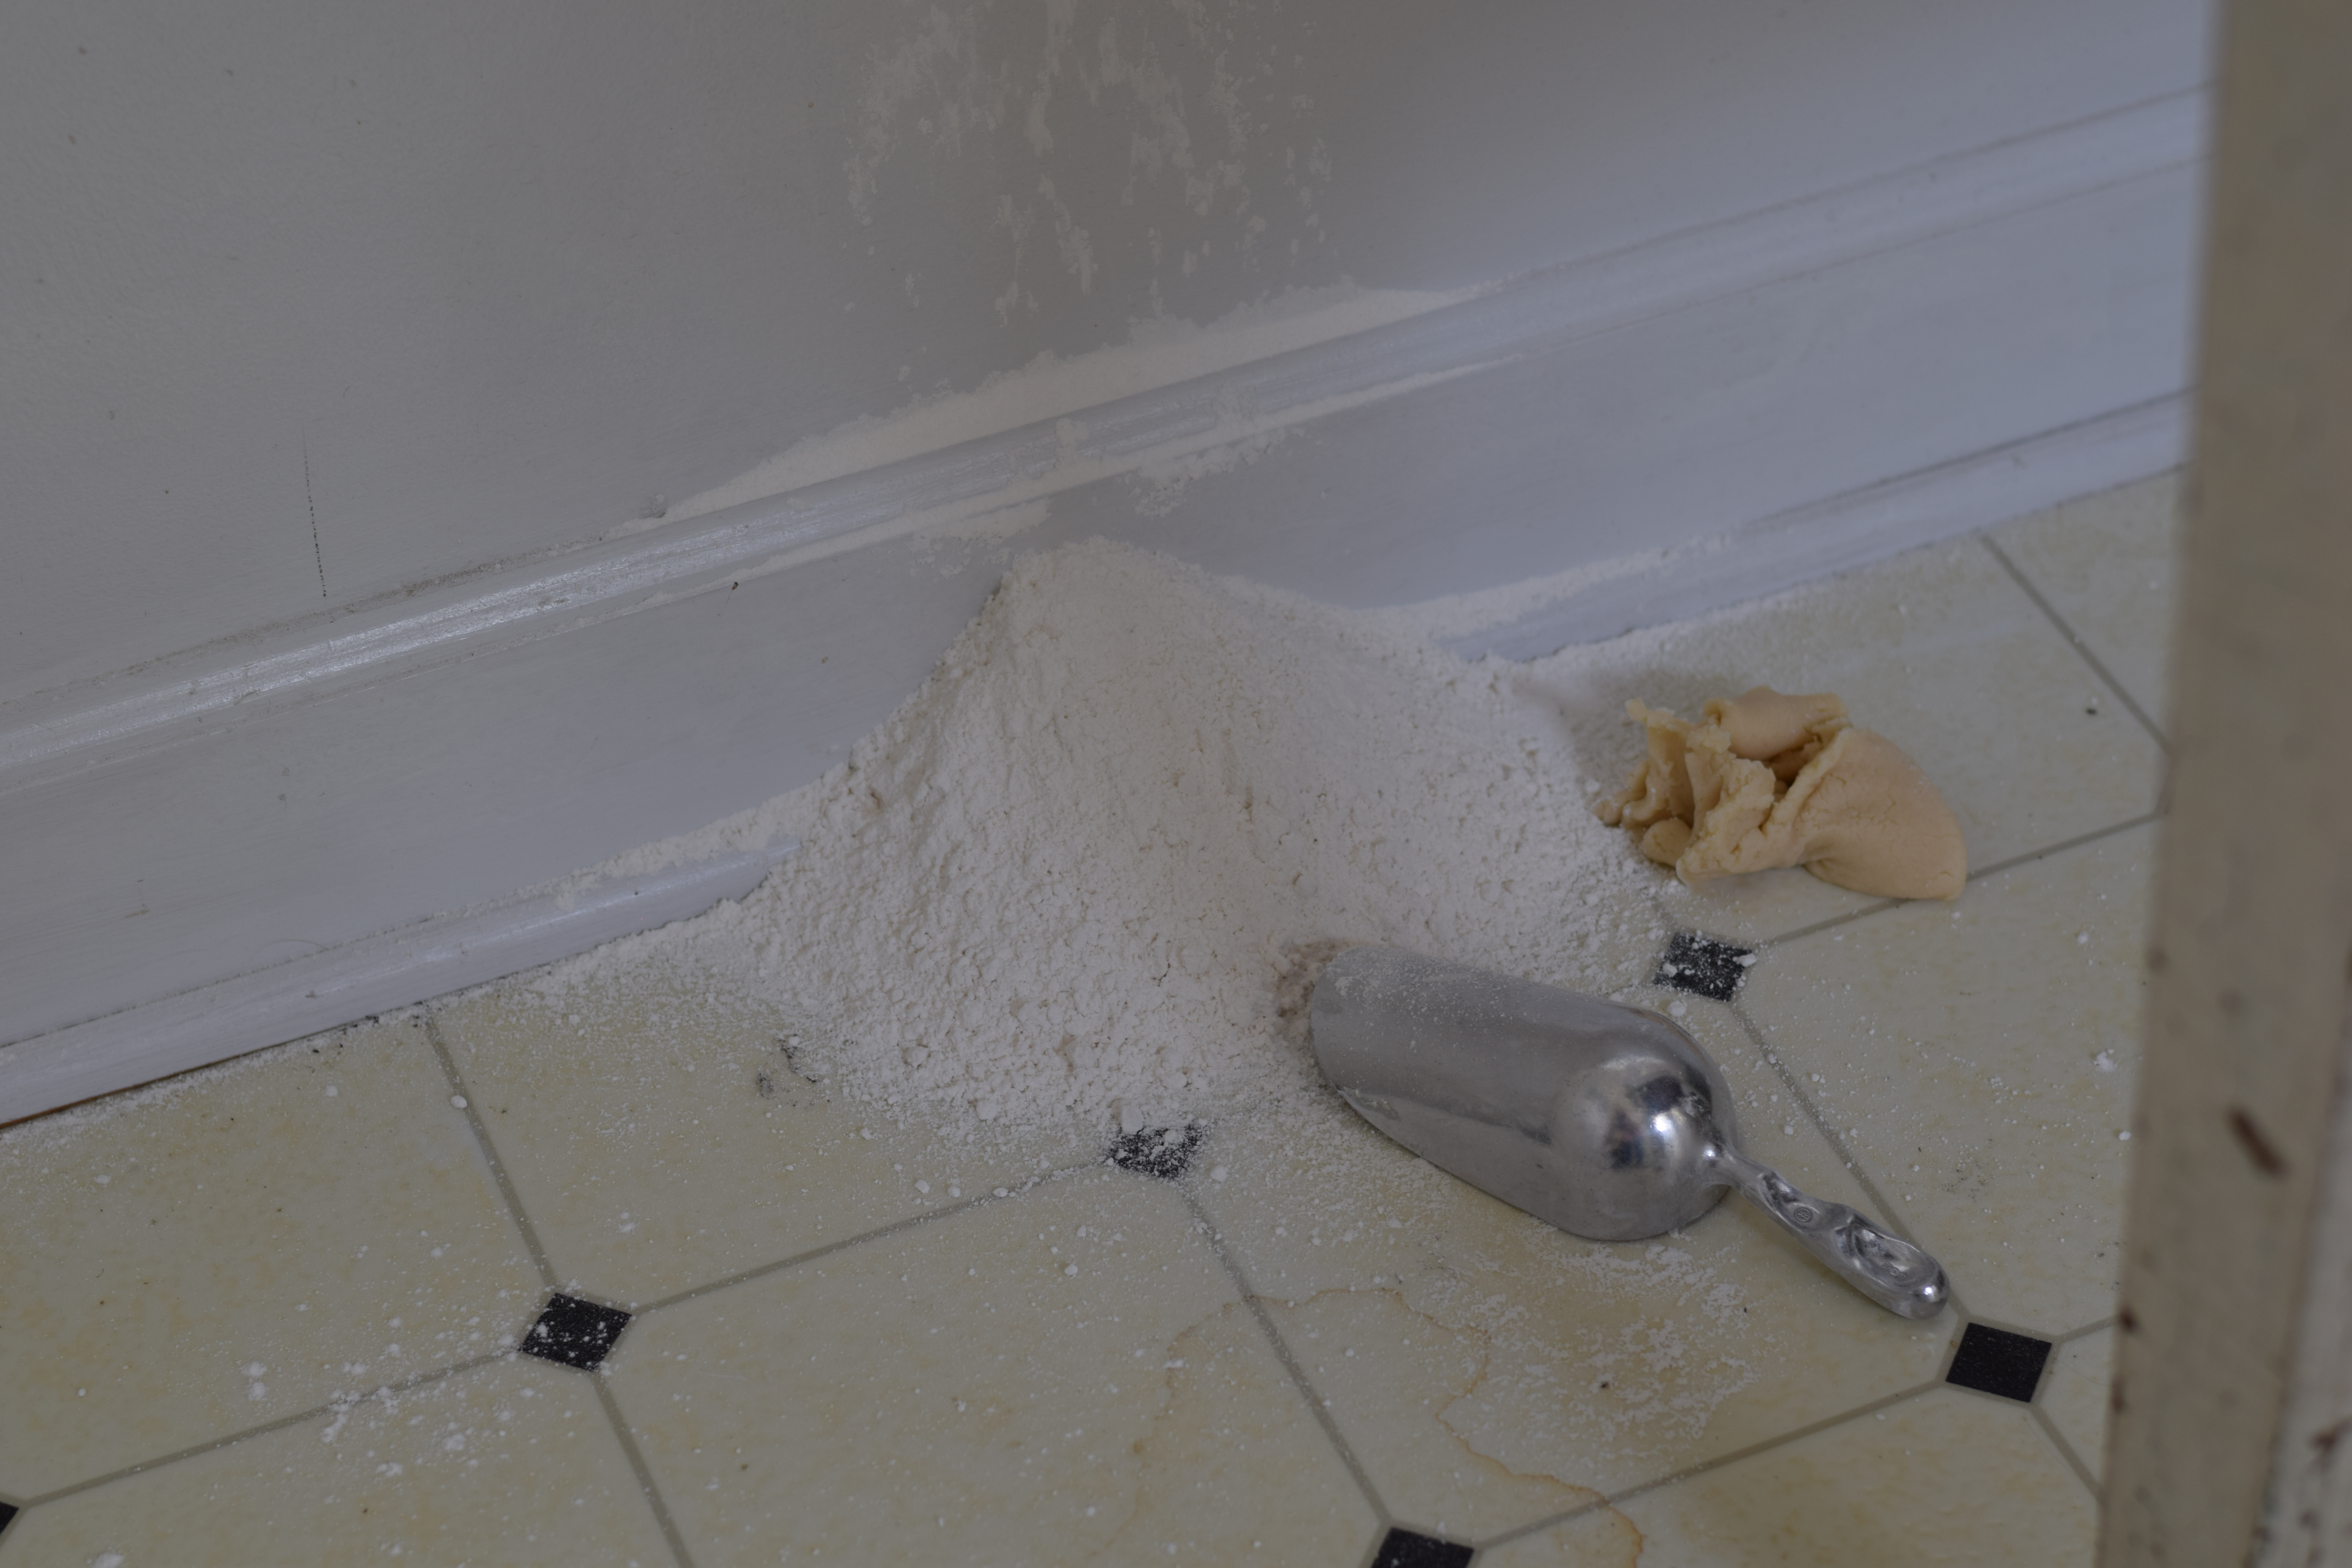
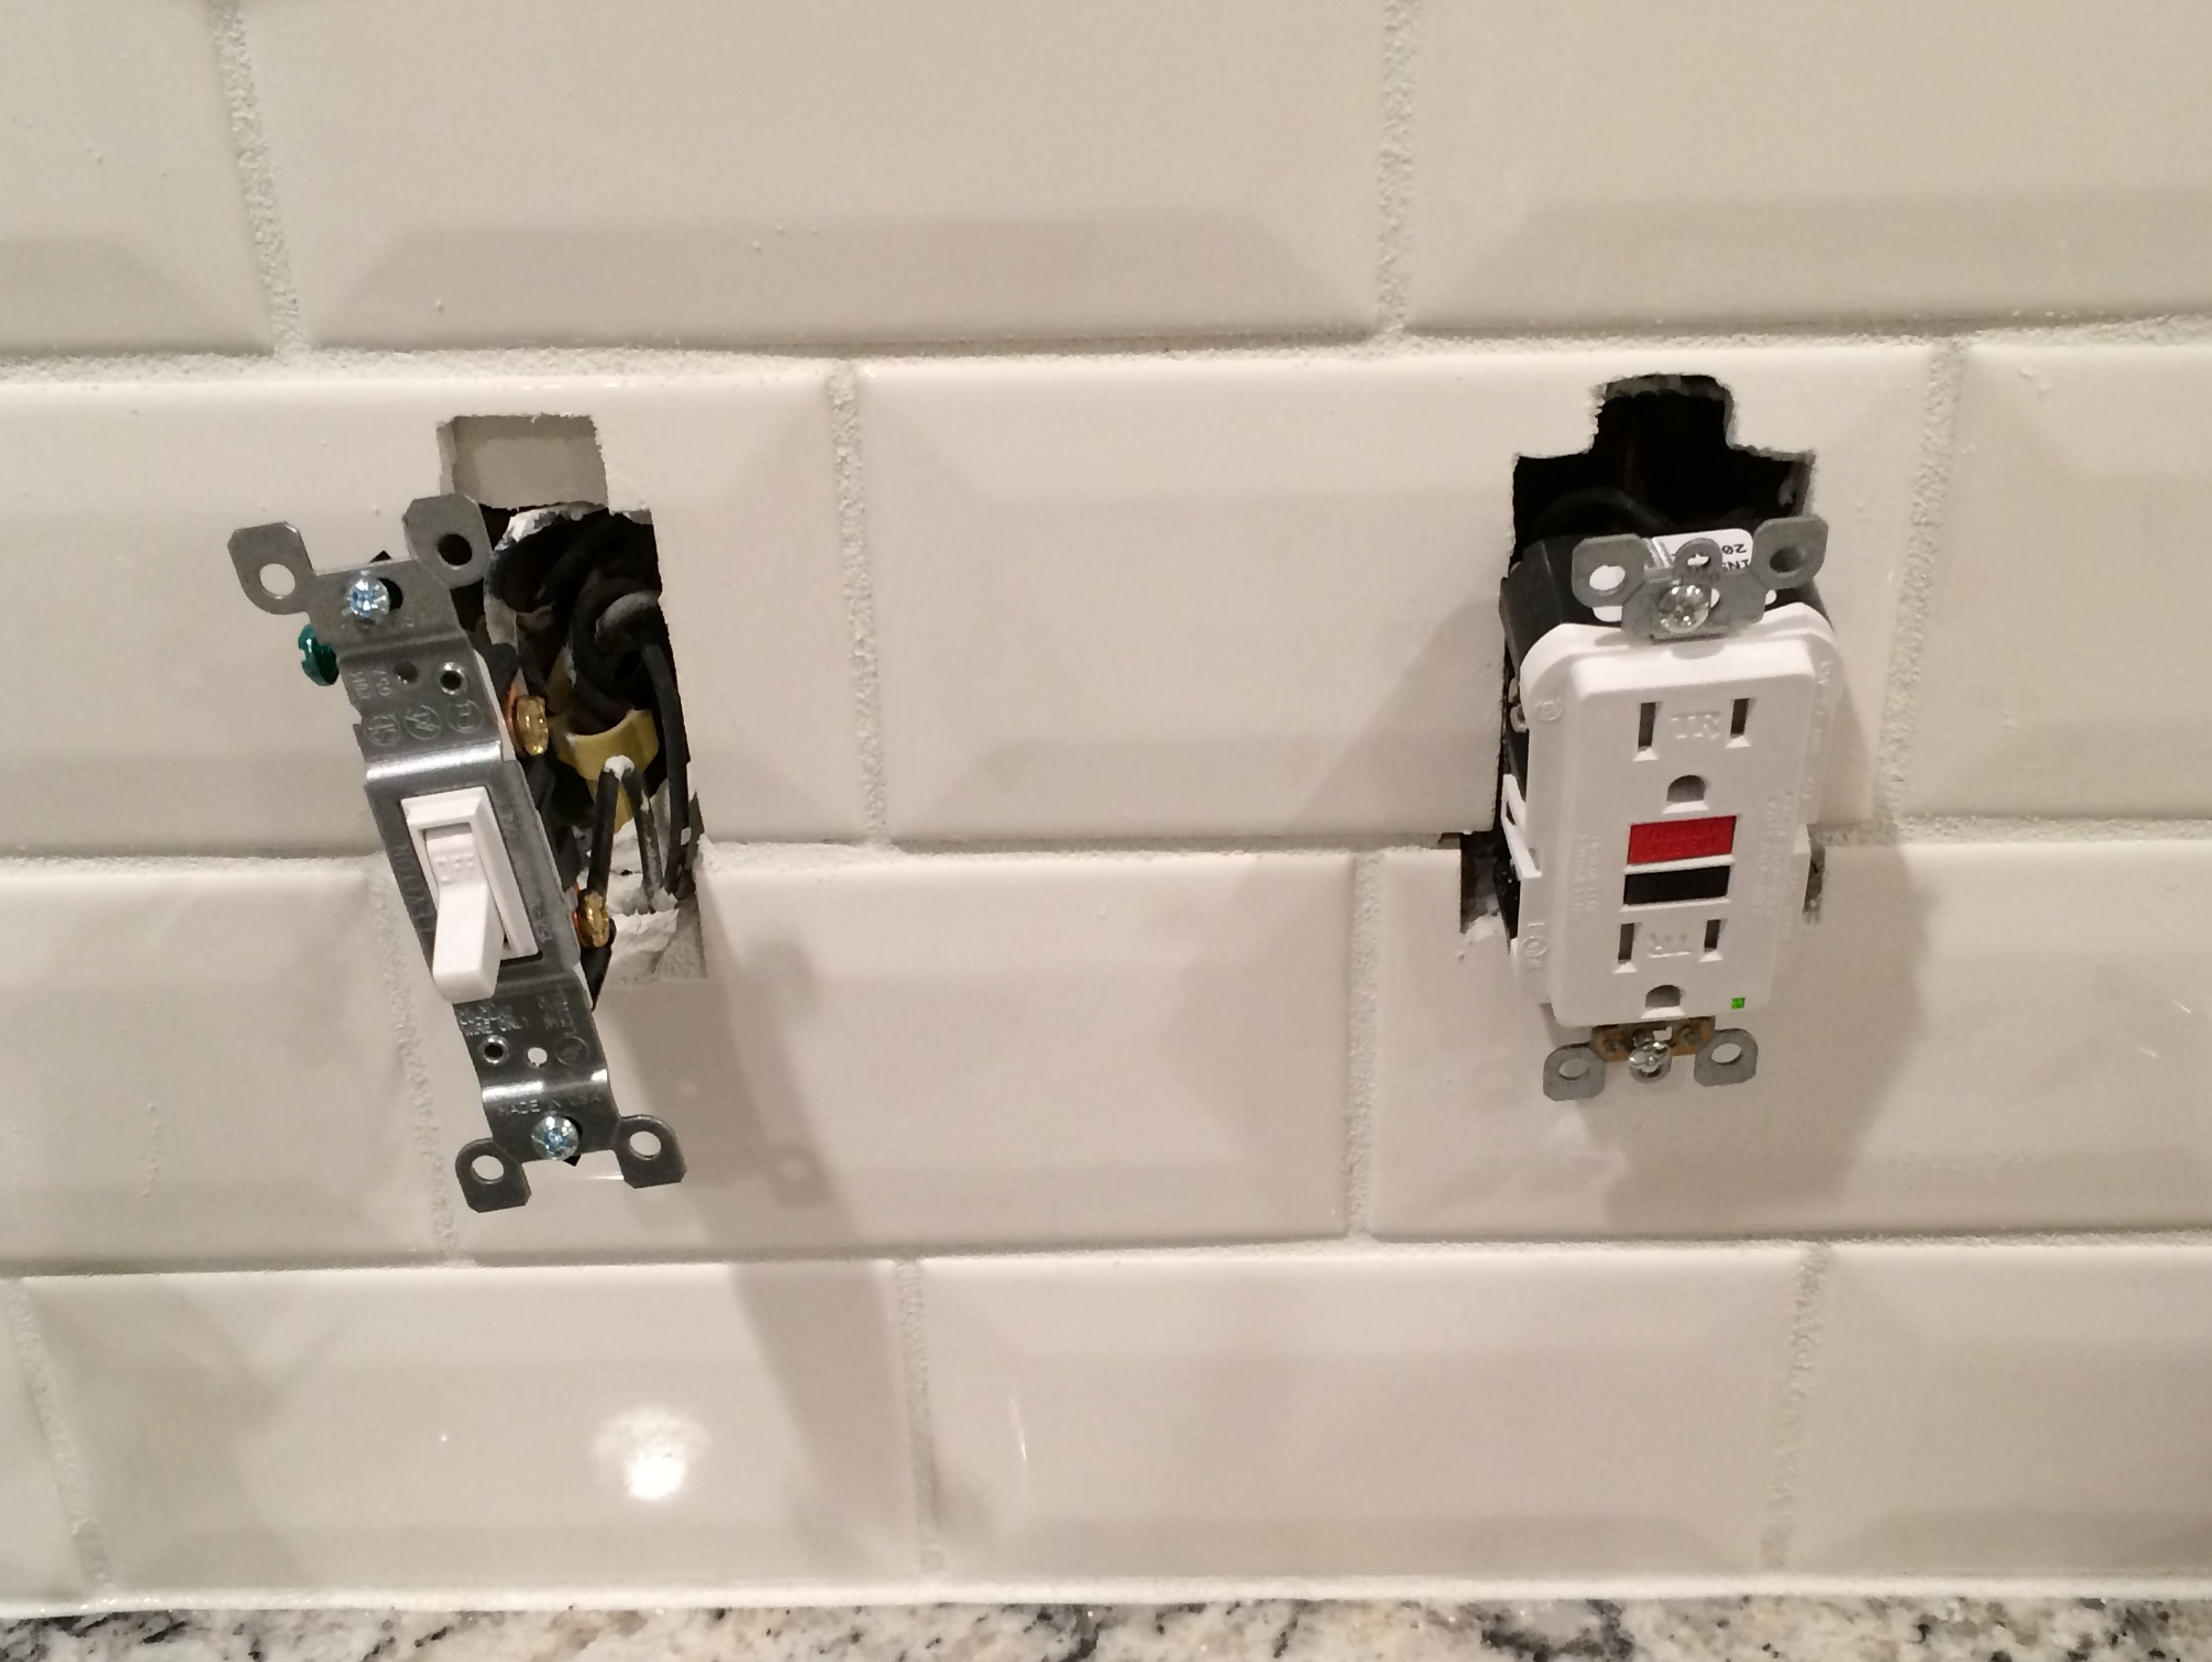
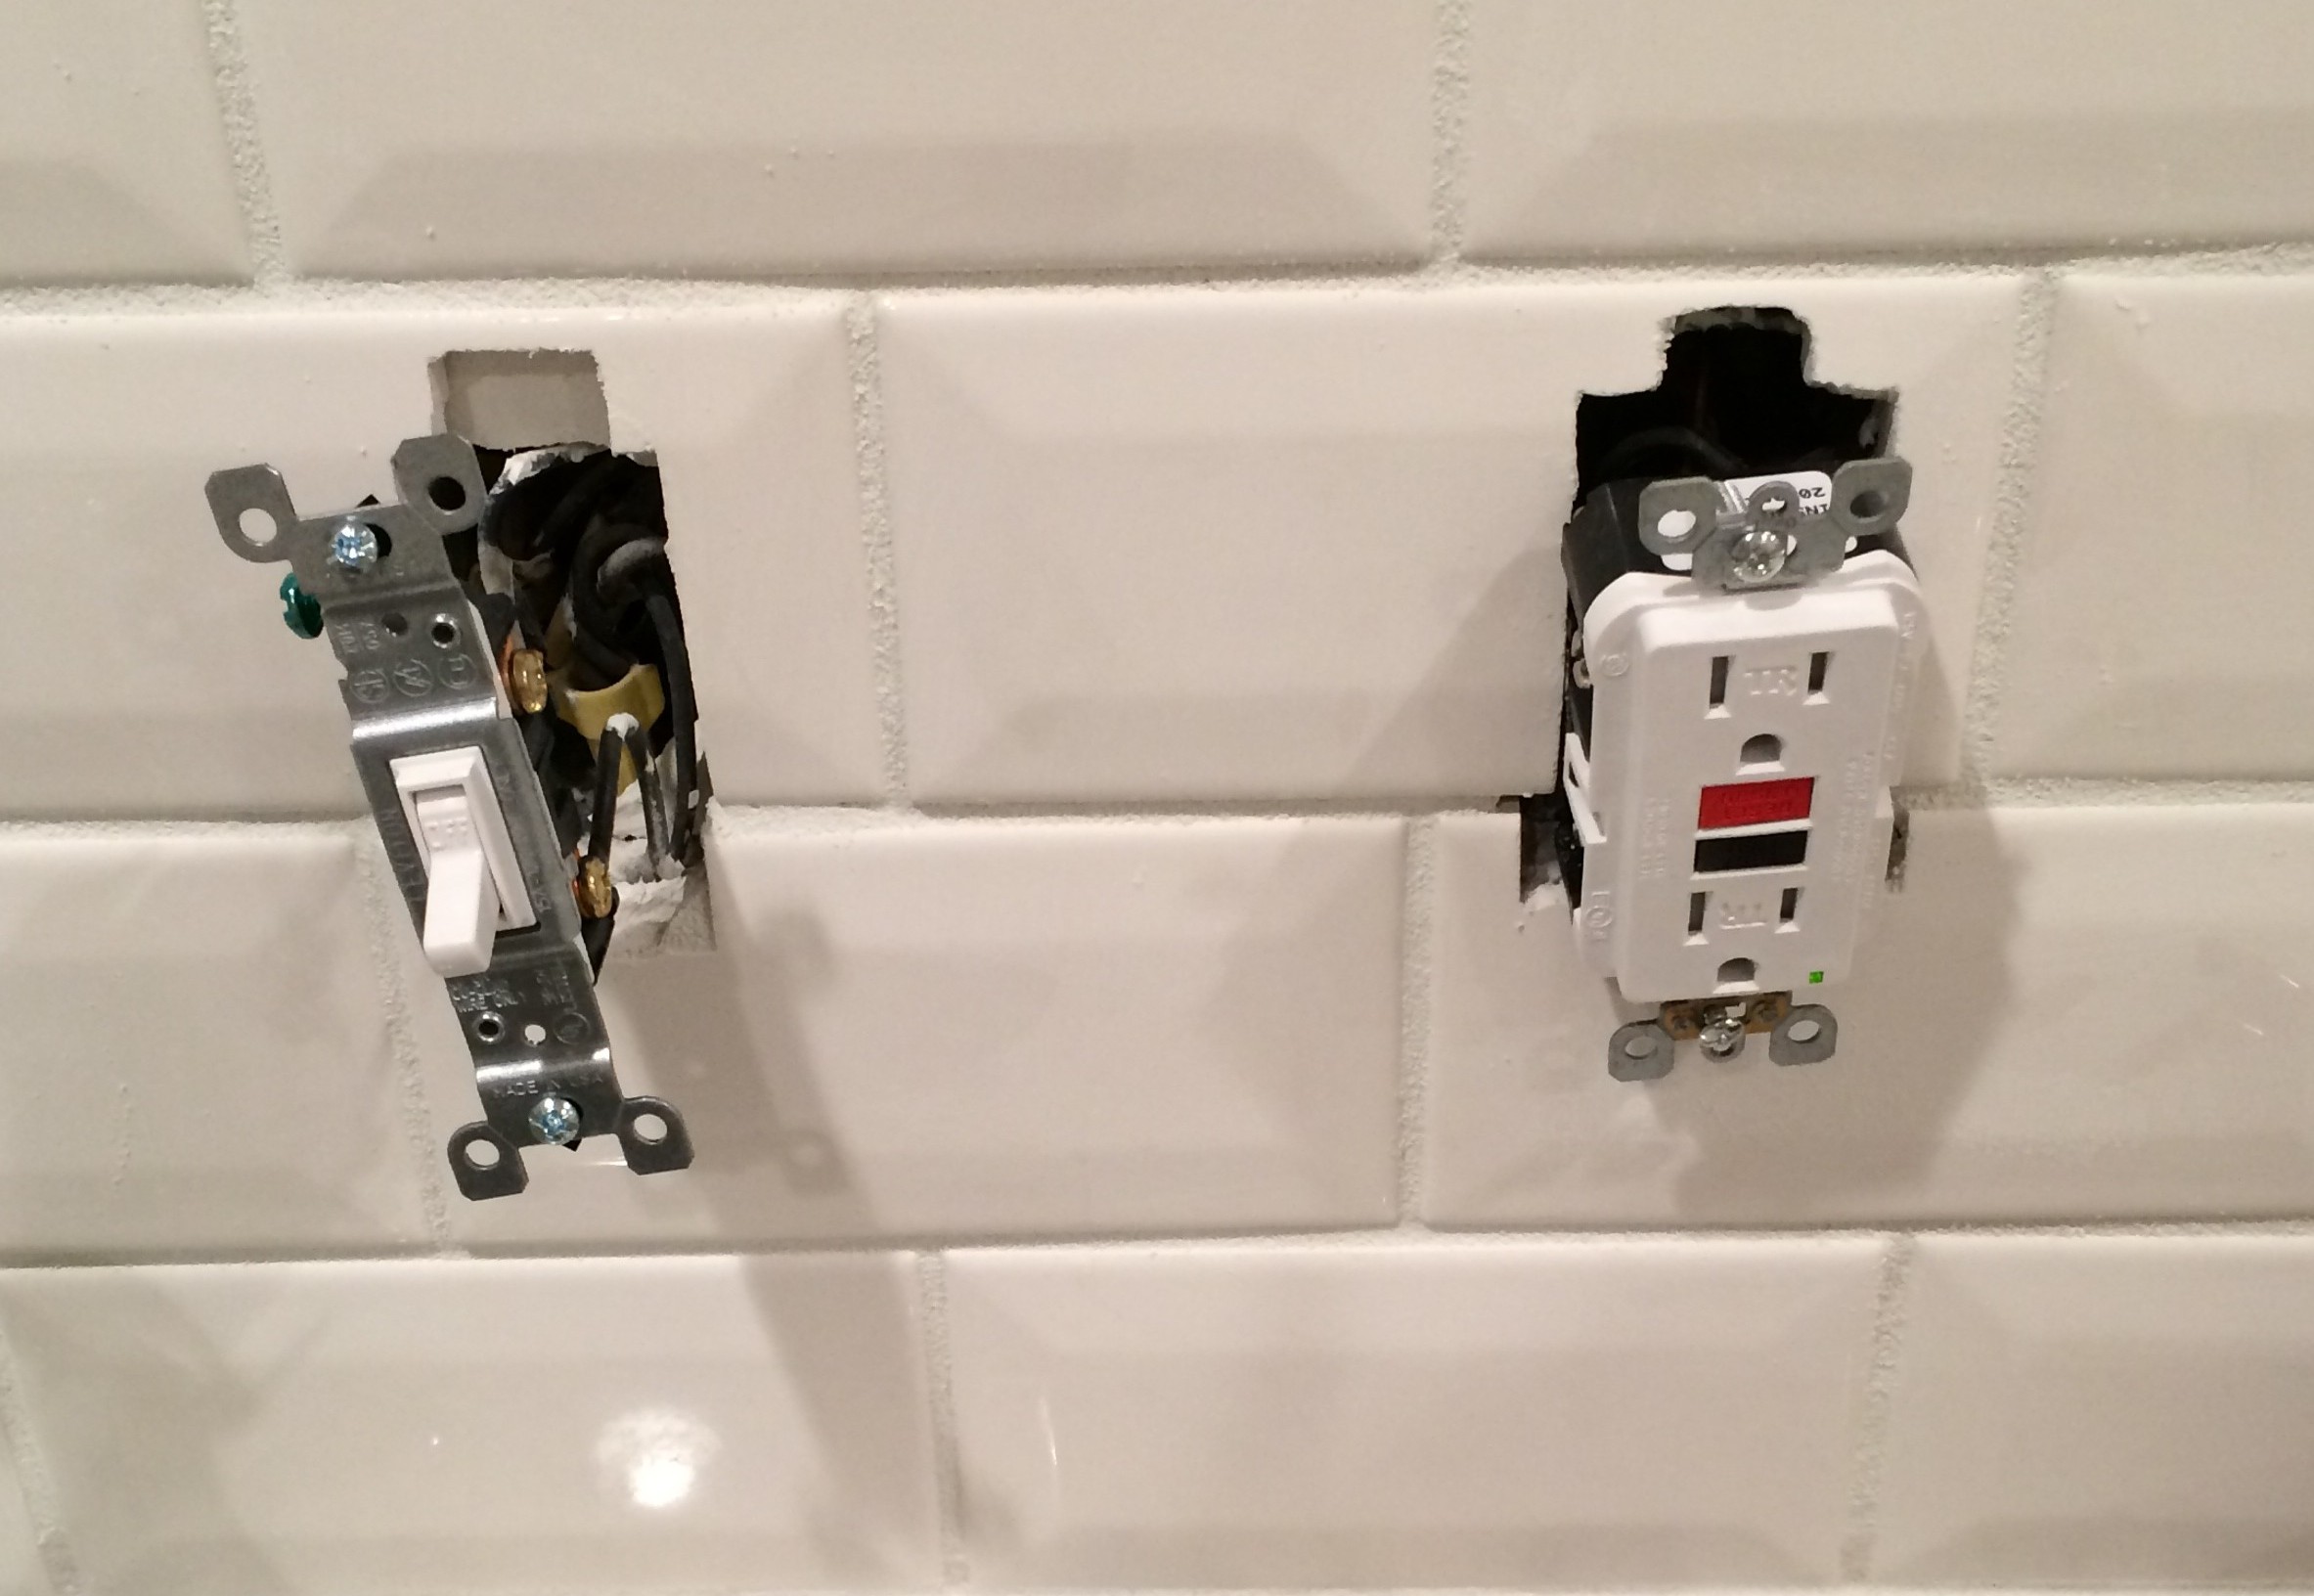
The picture I used for this post is my kitchen backsplash on move-in day, and I thought it was a good representation of how I was feeling on that day – sprung and crazy!  Oh, and here’s some advice – don’t believe your electrician when he tells you that plug is safe… unless you want to get shocked – literally!

renovation

I’ve learned so so much in the renovation, some of which is pretty useless, and some of which I wish I’d known and want to tell anyone and everyone who is about to embark on a renovation.  I’ll try to keep the list focused on the latter.  If you want to know things like how to describe a shower curtain rod with a right angle in it, I can help with that too, but I’m guessing that’s not why you’re reading this post.

  • Cover floors completely with paper taped down (or ask them to do it) before any work starts.  This protects your floor from paint and all the construction debris that can get ground into it.
  • Get a key box if you’re not living in the house you’re renovating so workers can come and go as they please while you’re not there.  It won’t take too many times of running over to meet contractors to see the value in this.
  • Take pictures of every room in the house that will be renovated.  That way if a problem occurs, you can prove that before the construction crew arrived, the problem wasn’t there.
  • Label the items you want to keep.  If anything  that you want to keep will be coming down in demolition, clearly mark it or take it out of the house.  Otherwise things just get taken to the dump or given to workers because they assume they’re trash.
  • Check on the house every day.  This is a pain, but it will help you can catch your workers in the middle of something they may be doing wrong and save time and reduce headaches.
  • During your daily house checks, stand for a while in each room just looking around for things you’ll notice later.  Do not assume it crossed the mind of the workers to center or line up anything.  You will be amazed at what you find.
  • Request on the front end that the workers not smoke on the premises and not leave any trash in or around your house.
  • Have a trash can and trash bags in the house.  The workers will not likely take the trash out, but at least most of the trash will be in one place.
  • Leave bottled water and Gatorade in the refrigerator for your workers.
  • Hide your outdoor trash can if you don’t want the workers using it.  In my city you’re not supposed to put construction trash out on the curb, but the workers crammed everything they could into my garbage can.
  • Exchange info with new neighbors.  The workers left my hose running all weekend at my house.  Thankfully my neighbor noticed and texted me.  As to preventing the workers from leaving the hose running… well, I don’t know how to prevent this ridiculousness other than to give them my Dad’s catch-all advice – “Don’t do the next dumb thing you’re going to do.”
  • Write your name on anything you leave at the house.  If you have a closet or room that will not have any construction, keep all your stuff in there.
  • Paint sample paint colors on foam core poster boards, and place them against walls for picking colors.  That makes it easy to see colors on every wall.
  • Stay on top of your workers.  This is easier said than done.  They don’t have the same urgency you have for getting the project finished.
  • Make crazy detailed lists.  This will help keep you from going crazy.  Well, maybe it will just delay the point where you go crazy.  If I were a superhero my superpower would be my memory, and I still needed lots of lists.  There are just too many things to remember to keep them all in your head.
  • If you’re paying all your workers separately (rather than paying the contractor) keep records of what you pay them, because there are so many checks going so many different ways that it will be hard to know at the end what you spent.
  • Ask tons of questions.  i.e. What exactly will that trim look like?  It’s overwhelming because there are so many details that it’s tough to remember this.  Sometimes the projects take on a life of their own, and if you care about the details, you need to make sure everyone knows you care.
  • Ask what decisions you’ll need to make in the next week or so in order to be ready when your contractor calls you from the plumbing supply store to ask which toilet you want.
  • As boring as this seems, make sure you’re involved in the grout decisions.  There is now a grout additive that is not expensive and makes your grout stain resistant.  This is a must-have.
  • Pick the actual slab of granite/marble or look at the tiles in the box when they arrive before they get installed.  I ended up with marble in my tub surround (installed while I was out of town) that was admittedly very pretty but wasn’t at all what I thought I was ordering.  Also, we had to send back the first load of travertine because it wasn’t close to the color we ordered.
  • There will be some surprises once demolition has started if it’s an old house.  Listen hard to their proposed workarounds, and remember that the first option they give you is probably not the only one, so ask until there is one you like.  And ask what each one costs.  Don’t be afraid to have your own ideas about what might work.
  • Know that it is going to cost more than the estimate… way more, and budget accordingly.
  • Have your renovation funds in your checking account ready to pay your workers, because they’ll spring an invoice on you Thursday evening and want it paid Friday in time for payroll.
  • Remember that you’re in charge and that you have the final decision-making power.  It’s easy to get pushed around by designers and contractors.  Remember it’s you who will be living in the house.
  • Throw in all the “extras” you want done while you have workers in the house.  For example I had a faucet installed on the back of my house for watering plants.  Add-ons are much less expensive when the workers are already at your house working than they will be later.
  • Turn your air conditioner off while work is being done that stirs up lots of dust.  The dust clogs up your filters and gets into your AC system, and it will cost you in AC service calls.  At the very least buy a few filters and have them change them regularly.
  • Remember that it will actually end, though it sometimes seems as if it never will!
  • But most of all, have fun and be creative with it!

This has been therapeutic for me to get this all written out, and hopefully it will help you avoid some of the frustrations I encountered.

And stay tuned for some before and afters as well as some new recipe posts!

Share Button

Fruit Pizza

Nothing makes me want a fruit pizza like Memorial Day and July 4th!  This is a great one, but be warned that it’s actually a little rich, so you really don’t need a huge piece.  

Ingredients

Crust

4 sticks butter softened

3/4 cup sugar

2 teaspoons vanilla

1 teaspoon baking powder

1/4 teaspoon salt

5 cups all purpose flour

<If you don’t want to make your own crust, just use bought sugar cookie dough>

Toppings

16 ounces cream cheese, softened

1 cup sugar

4 teaspoons vanilla (I might cut this to 2 or 3 next time)

Strawberries

Blueberries

Raspberries

Preparation

Place butter and cream cheese on the counter to soften to room temperature.

Instructions

Crust

Preheat oven to 350 degrees (325 convection).

Fruit Pizza Crust ingredients

This is a basic shortbread crust, and it made two fairly large flag shaped pizzas with enough left over for a small one.  So it would be safe to half the recipe.  Cream butter and sugar together.

Fruit Pizza Crust Step 1

Mix in vanilla.  Sift together baking powder, salt, and flour.

Fruit Pizza Crust dry ingredients sifted together

Mix them into butter/sugar mixture.

Fruit Pizza Crust Step 2

This dough is very difficult to move after you have rolled it out.  I rolled it out on a pastry cloth, which was a mistake, as it took several tries to transfer it in one piece.  I suggest you roll it out on a floured baking sheet (which will be much easier if your baking sheet doesn’t have sides!).  I neglected to get a picture, but use a rolling pin with a floured rolling pin cover.   Sprinkle a little flour on the dough if it seems a little sticky.

Fruit Pizza dough for crust
You’ll have much less frustration than I had if you roll out the dough on the baking sheet

Roll out the dough to the desired thickness.  If you get it too thin, it will break when you try to pick up a piece of pizza.

Cut the dough into the desired shape.  You can do this before or after baking, but I prefer before so that the edges look like the natural edge of a cookie.  I gave the flag a little curve to make it look like it was waving.  After multiple failures and a flour canister debacle, I managed to transfer the dough to a pan.

Fruit Pizza Crust ready for baking

four canister suicide, with one of the pieces of dough that hit the floor
The multiple attempts at transferring the dough took a toll on my floor. This was not the only glob of dough that hit the floor!

I suggest lining the pan with parchment paper.  It wasn’t terribly difficult to move off the pan without the parchment paper, but that would have made it easier.  Now at this point hopefully you’ve followed my advice instead of my pictures and have a nicely rolled out piece of dough on your pan.  That way you’ll be much less frustrated and will still have some enthusiasm for the toppings!

Bake at 350 (or 325 convection) for 10-15 minutes, until it starts to brown a tiny bit around the edge.  Baking time will vary depending on the thickness of your crust.

Fruit Pizza Crust

Toppings

As your crust cools, start working on the toppings.  This recipe works out well with the size of the crust recipe, so if you halved the crust, you’ll want to halve the topping recipe as well.

Fruit Pizza Toppings

Mix sugar and cream cheese.

Fruit Pizza Topping Step 1

Fruit Pizza Topping Step 2


Add vanilla.  You might want to start with half the vanilla and then add to taste.  Spread it on the completely cooled crust.

DSC_0778

Wash and dry berries.  Arrange them on the topping as you wish!

Fruit Pizza

Fruit Pizza FI


Share Button

Butter Muffins – 3 Ingredients!

These Butter Muffins are incredibly easy to make, have only three ingredients, and really taste like biscuits.  I like that I can get the biscuit taste with the consistency of a muffin and the bonus of no rolling pin required!  They’re great with butter and a little honey or jelly.  Next time you want an easy mess-free breakfast biscuit, try these!

Difficulty:  Easy… really, really easy

Source:  Southern Living from November 2000

8 ounces sour cream

1 cup (2 sticks) melted butter

2 cups self-rising flour

Yes, that’s it – only 3 ingredients!

Preheat oven to 350 degrees (or 325 convection).

Butter Muffins ingredients

Melt butter.

Butter Muffins ingredients measured

Stir all three ingredients until just blended.  It’s that simple!

Butter Muffins Step 1

Butter Muffins Step 2

Lightly spray muffin tin with cooking spray.  Spoon batter into muffin tins.

Butter Muffin batter in pan

I had enough leftover batter for 2-3 muffins after filling my 12-muffin tin and baked the leftover batter in greased ramekins.

Butter Muffins extra batter

The original recipe notes that it makes 36 mini muffins.  Bake for 25 minutes or until lightly browned.

DSC_0649

DSC_0693

DSC_0670

DSC_0689

DSC_0656

Share Button

Easy Chocolate Chip Cookie Bars

These Chocolate Chip Cookie Bars taste like an extra gooey chocolate chip cookie with a little bit of a cake-like taste made into a bar.  They rank among my favorite desserts, and they’re amazingly easy to make.  They’re much easier to make with a mixer, but you can hand stir them in a pinch as long as the butter is soft.  They are best served warm or at least the day you make them.  They’ll still be good the next day, but they go downhill fast because of how gooey and almost undercooked they are.  Take them to a party, and they’ll disappear FAST.  

Difficulty:  Easy

Source:  you guessed it – my mom

1 package yellow cake mix (preferably Duncan Hines Butter Golden)

1 cup brown sugar

1/2 cup softened butter (you could use margarine, but I stick with butter… no pun intended)

2 eggs

2 teaspoons vanilla

1 cup of semi-sweet chocolate chips

3/4 cup pecan pieces (optional, and I’m always always always going to leave any type of nuts out of the recipe)

Chocolate Chip Cookie Bars - Ingredients

Preheat oven to 350 degrees or 325 convection.  Mix all ingredients except chocolate chips and pecans.  When thoroughly mixed, spread in a greased 9×13 inch pan.  Pam (original flavor) is my favorite cooking spray, but just be sure not to grab the garlic flavored Pam your roommate bought years ago and never used.  I can tell you from experience, that will completely ruin your dessert.  I get a bad taste in my mouth just thinking about it.

Chocolate Chip Cookie Bar dough

Sprinkle with chocolate chips (and pecans if you choose).  It looks like a lot of choc chips, but remember that they’re not mixed into the batter, so this is just right when they mix in as they bake.

Chocolate Chip Cookie Bars ready to bake

Bake at 350 degrees for about 25 minutes (or 325 convection for 20 minutes).  I take them out of the oven when the top has browned a little and the edges have browned a little more and start to pull away from the sides.  It may not look quite done in the middle, but that’s what makes it so perfectly gooey when it cools.  It will still be good if you cook it a little longer – just more like the consistency of a brownie.

DSC_0568

Let it cool, and cut it into bars.  They are best on the day that they are made.

DSC_0622

DSC_0591

Chocolate Chip Bars square

The Story:  To redeem myself from the last few times I’ve been caught empty-handed at the “what did you bring us” question, I dropped these off at my friend’s house – the one with 4 boys age 1-7.  She sent me this picture a few hours later.

Choc chip bars - empty pan

And the 7 year old doesn’t like chocolate, so they were down a man when trying to conquer this pan.  Now THAT is impressive.  No word on whether anyone made themselves sick…

Share Button

Chef Jenn’s Herbed Crawfish Flatbread

I went to a cooking class led by Chef Jenn a few weeks ago, and the Herbed Crawfish Flatbread was my favorite item from the night.  You can find the Herbed Crawfish Dip at Kroger in the frozen seafood section, and it’s excellent served as a dip as well.  It’s a fancy pizza that is simple to make and is delicious – what more can you ask for?

Want to know more about Chef Jenn and her seafood dips?  Here’s her website: 

http://www.chefjenn.com/

Difficulty:  Easy

Source:  Chef Jenn

1 handful of chopped, fresh spinach

1 container Chef Jenn Herbed Crawfish Dip

1 Stonefire (or your favorite) pizza crust

1 cup shredded mozzarella

2 tablespoons grated parmesan

Preparation:  Defrost crawfish dip for a few hours so that it is easy to spread.

Preheat oven to 450 degrees.

Chef Jenn's Crawfish Flatbread ingredients

Place crust on a baking sheet.

stonefire crust

Spread defrosted dip on flatbread (I used half the container of dip for one flatbread).

flatbread with crawfish dip

Add chopped spinach.  Here I piled several spinach leaves on top of each other and then rolled them up like a cigar and cut them.  That gave me sort of curly strips of spinach, which are easier to eat and cuter than whole leaves to me.  And why not make your spinach cute?

chopped spinach

Add cheeses.


crawfish flatbread with mozzarella and parmesan

Bake 10-12 minutes on lower rack of oven until crisp and bubbly.  Mine was perfect after 10 minutes in the oven.

  DSC_0556

DSC_0557


Share Button

Sugar Topped Muffins

These Sugar Topped Muffins are fluffy and moist with a simple flavor that complements any meal.  And they’re very easy and quick to make… when I was in high school I used to make them while my mom made the rest of the meal.  Also, I’ve included an alternate recipe at the bottom in case you don’t have buttermilk on hand.

Difficulty:  Easy

Source:  my mom, of  course

1 3/4 cups flour

1/4 cup sugar (plus more for sprinkling on top)

1 teaspoon baking powder

1/4 teaspoon baking soda

3/4 teaspoon salt

1 egg, beaten

3/4 cup buttermilk

1/3 cup canola or vegetable oil

Preheat oven to 400 degrees (375 convection).

I forgot to include the egg in the ingredient pic!

Mix together dry ingredients in mixing bowl.

Sugar Topped Muffins dry ingredients 1

Make a hollow in the center.

Sugar Topped Muffins dry ingredients

Combine egg, milk, and oil.

Sugar Topped Muffins wet ingredients

Sugar Topped muffins wet ingredients mixed

Add all at once to hollow in dry ingredients.

Sugar Topped Muffins all ingredients

Stir with spoon just enough to moisten dry ingredients.  The batter should remain lumpy.

Sugar Topped Muffins batter

Line muffin tin with paper liners and fill two-thirds full.  This recipe should make 12 muffins in a standard size muffin pan.  As an aside, I really like light colored pans for baking.  The dark pans are easier to find in stores but seem to burn things faster.  And this one has the nice handles on the ends so you don’t mash a muffin with your hot pad when taking them out of the oven.

Sprinkle sugar on the batter in each muffin tin.

Sugar Topped Muffins in pan 1


Sugar Topped Muffins in pan 2

Bake for 12 minutes or until the tops of the muffins start to turn a tiny bit brown.

Sugar Topped Muffins 1

DSC_0487

DSC_0503

Variation:  Sprinkle with cinnamon and sugar instead of plain sugar.

The Story:  These muffins are in the cookbook my mom made with her friend Mary Elizabeth.  There are lots of items with two different recipes in this book – our family recipe and Mary Elizabeth’s family recipe (i.e. Mother’s Rolls and Mammaw’s Rolls).  There are a few items with two recipes from my mom, and Sugar Topped Muffins is one of these.  This recipe is actually for Sugar Topped Muffins II, and it’s my favorite.  The other (Sugar Topped Muffins I) is good as well but is a little more trouble and a little higher in fat.  However, (and by the way, I cannot write “however,” without thinking of that teacher who always verbalized the comma – “However comma, we should consider….”) the Sugar Topped Muffins I recipe is handy if you don’t have buttermilk.  It does involve some cutting of shortening, though.  The recipe is below.

2 cups flour

2 1/2 teaspoons baking powder

1/4 cup sugar

3/4 teaspoon salt

1/2 cup shortening

1 egg, beaten

3/4 cup milk

Stir together dry ingredients.  Cut in shortening with pastry blender or two knives until crumbs are the size of small peas.  Make a hollow in the center.  Combine egg and milk, and add them to dry ingredients.  Stir until just mixed but still lumpy.

Line muffin tin with cupcake liners and fill 2/3 full with batter.  Sprinkle tops of muffins with sugar or sugar and cinnamon.  Bake in 400 degree oven for about 20 minutes or until done.

Share Button

Snickerdoodle Pie (Crustless)

In my quest to find my favorite Snickerdoodle recipe, I’ve come across several Snickerdoodle-inspired recipes that aren’t for cookies.  I tried this one over the weekend with some adjustments – mainly that I skipped the crust.  I liked it a lot, and next time will try a few alterations to make it less cakey and more moist.  The cinnamon/sugar/butter mixture that I used as a middle layer of the pie is perfectly gooey and delicious.  The cinnamony syrup that is poured over the top of the pie cooks into a crusty top layer for the perfect amount of cinnamon topping, though mine does not look as pretty as the picture from the inspiration recipe.

Source:  http://www.tastesoflizzyt.com/2013/05/01/snickerdoodle-pie/

If you want your Snickerdoodle Pie to have a crust, use 1 pastry shell

Cinnamon Syrup top layer

1/4 cup butter, melted

1/4 teaspoon cinnamon

1/2 cup brown sugar

2 tablespoons water

2 tablespoons corn syrup

1 teaspoon vanilla

Cinnamon Middle Layer

2 teaspoons melted butter

1 teaspoon ground cinnamon

1 teaspoon sugar

Batter

1/4 cup softened butter

1/2 cup sugar

1/4 cup powdered sugar

1 teaspoon baking powder

1/2 teaspoon salt

1/4 teaspoon cream of tartar

1 egg

1 teaspoon vanilla

1/2 cup milk

1 1/4 cups flour

Preheat oven to 350 degrees (325 if using convection).  If you’re using a pie crust, place it in a 9 inch pan.  I prefer skipping the crust.

Cinnamon Syrup Top Layer

Snickerdoodle Pie Top Layer Ingredients

Mix all syrup ingredients other than vanilla in a small saucepan.  Bring to a boil and let it boil gently for 2 minutes, stirring occasionally until the sugar is dissolved.

Snickerdoodle Pie Cinnamon Top Layer

Remove the pan from the heat and add 1 teaspoon vanilla.

Batter

Snickerdoodle Pie batter ingredients

Mix the butter and sugar until light and fluffy in your mixer.  Mix in the egg and vanilla.  Then mix the dry ingredients together and blend them into the mixture.

Snickerdoodle Pie batter 1

Slowly add milk while mixer is running.

Snickerdoodle Pie Batter 2

Once the batter is just blended, pour half of it in a greased pie plate (or pie crust without any butter).  Note:  the original recipe calls for the crust, then what I’m calling the Cinnamon Middle Layer, and then all of the batter.  I moved this layer to the middle so that it wouldn’t stay on the bottom of the pan.

Snickerdoodle Pie first layer

Cinnamon Middle Layer

I was having a little trouble with my horizons today!

Pour the melted butter on the batter and spread it around around as evenly as you can.  Sprinkle 1 teaspoon each of cinnamon and sugar onto the butter layer.

Snickerdoodle Pie Cinnamon Middle Layer

Pour the remaining batter over the cinnamon middle layer.

Snickerdoodle Pie before Syrup Layer

Pour the Cinnamon Syrup Top Layer on top, covering the entire pie.

Snickerdoodle Pie pouring top layer

Snickerdoodle Pie ready for baking

Cover the edges of the pie in foil.  Bake at 350 degrees (or 325 convection) for 25 minutes.  Then take the foil off, and bake for an additional 20-25 minutes.  Serve warm, adding ice cream if you wish.

Snickerdoodle Pie

Snickerdoodle Pie Slice

Snickerdoodle Pie Served

DSC_0389


Share Button

Snickerdoodles

I’m on a quest for a favorite recipe for Snickerdoodles, and today I tried the first recipe on my list.  Why Snickerdoodles?  My godson (remember Bo from the BO cake with French Silk Frosting?) has an older brother who does not like chocolate.  So until I succeed in bringing him over to the dark side, I’m tasked with trying to find something to make for his birthday that he likes… other than cinnamon rolls!  Hence, my quest for the best Snickerdoodles recipe is in full force as his April birthday approaches.

Source:  I had two sources for this taste test – http://smittenkitchen.com/blog/2009/09/snickerdoodles/  for the cookie recipe and http://www.yellowblissroad.com/caramel-stuffed-snickerdoodle-cookies/  for the addition of the caramel to some of the cookies for a chewy center

Difficulty:  Easy

Reason I tried this Snickerdoodle recipe first:  I usually like recipes from the Smitten Kitchen (and really like her philosophy), and it was adapted from a Martha Stewart recipe – so it came from two great sources.

Verdict:  I really liked the cookies, and the ones with the caramel filling were extra special.  The birthday boy deemed them “awesome!”  And another taste tester suggested a bit more cinnamon.  Next time I make them I’ll try a few adjustments, which I’ll note below.  If you’re looking for a chewy snickerdoodle, this is your recipe.  I love chewy cookies, so these fit my taste.  However, I usually think of snickerdoodles as a bit more cakey than this, so I think I’ll keep looking for a recipe that is a little more fluffy and cakey in the middle.

2 3/4 cups all purpose flour

2 teaspoons cream of tartar

1 teaspoon baking soda

1/4 teaspoon salt

2 sticks unsalted butter at room temperature (Note: next time I’ll try salted butter or more salt)

1 1/2 cups sugar

2 large eggs

Cinnamon and sugar for coating batter:

1/4 cup sugar

2 tablespoons ground cinnamon

Snickerdoodle Ingredients

Preparation:  An hour to a day ahead, make batter and refrigerate.  Sift together flour, cream of tartar, baking soda, and salt.  Set aside.

Snickerdoodles dry ingredients 1

Sifting Snickerdoodles dry ingredients

In the bowl of an electric mixer and using the paddle attachment, combine butter and 1 1/2 cups sugar. Beat on medium speed until light and fluffy.

Snickerdoodles butter and sugar

Scrape down sides of bowl.  Add eggs, and beat to combine.

Snickerdoodles after adding eggs

Add dry ingredients, and beat to combine.

DSC_0149

Chill the dough in a covered bowl for an hour to a day ahead.  Chilling makes it easier to roll the dough into balls before baking.

When ready to bake:  Preheat the oven to 375° (original recipe called for 400°), with one rack in top third and one rack in bottom third of oven.  Line cookie sheets with silicone baking mats or parchment paper.

In a small bowl, combine remaining 1/4 cup sugar and the ground cinnamon.  Use a small cookie dough scoop to form uniform balls of the dough, and roll in cinnamon and sugar mixture.  For some of the cookies, I cut a caramel in half and punched it into the dough ball.  Then I wrapped the dough around the caramel and remade the ball before rolling it in the cinnamon and sugar mixture.  Note:  I will experiment with different caramels, as these got pretty difficult to chew once they cooled.

Caramels

Snickerdoodle dough balls

Place about two inches apart on the prepared baking sheets.  Bake until the cookies are set in the center and begin to crack (they do not need to brown), about 8-10 minutes, rotating the baking sheets after four or five minutes.  Let cookies cool on cookie sheet for about five minutes before moving the cookies to the rack.  Store in an airtight container.

Snickerdoodles 2

DSC_0300

DSC_0284


Share Button

Easy Oven Rice

Easy Oven Rice makes a great side for a beef or pork dish with its beef consomme and oniony flavor.  It reheats well, so you can enjoy it for the next few days as leftovers – that is, if you have leftovers!  It requires very little preparation, and since it cooks for an hour, it does not require any prep time just before dinner is ready, which makes it an easy addition to your meal.

Difficulty:  Easy

1 10-ounce can French Onion Soup

1 8-ounce package of mushrooms (I used sliced baby bellas)

1 cup white rice, uncooked

1/2 stick butter (original recipe called for a whole stick, but 1/2 stick is plenty)

1 beef bouillon cube

Easy Oven Rice Ingredients

Preheat oven to 350 degrees.  Saute mushrooms in a little butter until almost done.

Sauteed Mushrooms for Easy Oven Rice

Stir beef bouillon cube in a saucepan with a soup can-ful of hot water (use the French Onion Soup can) until dissolved.  Then mix all ingredients in 9×13 casserole dish.

Easy Oven Rice ingredients in dish

Easy Oven Rice ready for baking

Bake at 350 for 50 minutes to an hour, stirring once about halfway through the cooking process.

Easy Oven Rice


Shortcut:  If you want to make this recipe even easier, substitute canned mushroom stems and pieces for the fresh mushrooms and a 10-ounce can of beef consomme for the bouillon cube and water.

Share Button

Poppy Seed Chicken

Well, I braved the grocery store even though we were facing a winter storm warning, which always causes a mad rush.  My reward to myself for grocery shopping among the weather-panicked masses was a comfort food dinner of Poppy Seed Chicken, and it was the perfect food for a cold and rainy night that’s quickly turning into an even colder and icy/snowy night.  This classic chicken dish with a buttery mixture of Ritz crackers and poppy seed on top is great for serving a crowd… just be sure to make plenty because people will be going back for seconds!

Difficulty:  Easy

6-8 chicken breasts

chicken broth for cooking chicken

8 ounces cream cheese

2 cans cream of chicken soup (I like to use one low fat and one regular can)

one sleeve of Ritz crackers

1 tablespoon poppy seed

1/2-1 stick of butter

Poppy Seed Chicken Ingredients

Cook chicken breasts.  I usually buy boneless skinless breasts to make it easier on myself.  Bring chicken broth to a boil on the stovetop.  Add chicken to broth and turn heat down to get the chicken broth to a low simmer – just moving, but not bubbling a lot.

Broth for cooking chicken

Place lid on pot and cook chicken for about 15-20 minutes or until chicken is white all the way through.  If you use chicken strips, they will be ready earlier, probably after 10-15 minutes. If you’re using bone-in chicken pieces such as leg quarters, it will take longer – closer to 45 minutes.  I like to cook extra chicken to really stuff the casserole with chicken and then use the leftover chicken for homemade chicken salad.

Debone chicken breasts (if not using boneless) and cut them into small chunks.

Cooked Chicken Breasts cut up for Poppy Seed Chicken

Heat cream cheese and cream of chicken soup until melted enough to be easily mixed together.

cream cheese and cream of chicken soup

Cream Cheese and Cream of Mushroom Soup melted

Mix chicken into cream cheese/soup mixture.  Place in 9×13 casserole dish or spread out into smaller dishes.

Poppy Seed Chicken in dish ready for topping

If I’m not cooking the casserole right away, at this point I cover the dish in foil and place in refrigerator until ready to bake (not more than a day or so later).

When ready to bake, preheat oven to 350 degrees (325 convection).  Crumble one sleeve of Ritz crackers and mix with poppy seed.

Poppy Seed and Ritz Cracker topping

Sprinkle mixture over casserole.

Poppy Seed Chicken ready for butter

Melt butter and drizzle over the cracker topping.  The original recipe calls for an entire stick of butter, but you can definitely cut back on this and still have a delicious casserole.

Poppy Seed Chicken ready to be baked

Bake for 30-45 minutes or until bubbly.  If you’re using smaller casserole dishes like I did, this will be closer to 25-30 minutes.  Serve hot.

Poppy Seed Chicken

Poppy Seed Chicken

The Story:  When I was in college, this dish was a favorite at my sorority house.  Despite the obsession with low fat everything, the attendance at Poppy Seed Chicken dinners was always high.  This recipe came to mind because one of my college roommates just had her third baby, and I believe this is the dish I took to her as a nostalgic comfort food dinner when she had her first baby several years ago.  So Ady, this one was inspired by you and baby James!


Share Button